
There’s nothing more exciting than awaiting the pending arrival of new chickens, even more so when you have hatched the baby chicks yourself! While the incubation period may seem daunting, below we have given you our top tips to help take the stress out of this all important and rewarding experience, which will give you the best chance of hatching lots of new little fluffy friends!
1. Select the Best Eggs
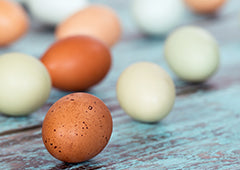
When it comes to choosing the eggs you wish to incubate make sure you select fertilized eggs with no imperfections from your healthiest and strongest birds. Choosing poor quality eggs that are over a week old will minimise your chances of successful hatching. You should choose eggs that are as close as possible to being perfect in shape and texture-avoid those that have lumps or bumps or thin shells, as well as overly small or large eggs.

2. Choose the Right Incubator
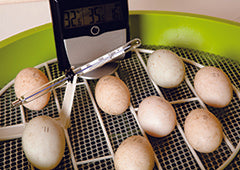
Choosing the right incubator really comes down to how many eggs you are wanting to hatch, how much effort you are willing to put into looking after your eggs during incubation, and how much money you are willing to spend. However, there are a number of features that your incubator should have to help make this experience a little easier, and minimise risk.. As eggs need to be turned very regularly, your incubator should have an automatic egg turner to do this time-consuming task for you.  It is also important that it has a very accurate and powerful temperature control. As having the right temperature and humidity of your eggs environment is the key to them hatching, this is one feature that your incubator MUST have! A temperature and humidity alarm is also handy to alert you when the hatching temperature/humidity has gone out of range-saving you from constant and continual checking.

3. Prep your incubator
Because incubators are responsible for helping to create new life, you want to make sure that it is working as it should. In preparation for your eggs, make sure you thoroughly clean and disinfect the incubator and ensure that is fully dry before use. Make sure that you have chosen an appropriate place to keep your incubator throughout this period-out of a direct sunlight, or places where the temperature fluctuates, as well as avoiding places where it can easily be knocked or disturbed. If possible, run your incubator for a week prior to putting the eggs inside, (or 24 hours at least) as this will allow you to see exactly what is going on inside the incubator, giving you time to make any necessary adjustments to settings if need be.

4. Heat & Humidity is Key!
Maintaining the correct heat and humidity inside your incubator is the single most important part of the incubation and hatching process. The temperature and humidity can be the difference between a successful hatch and a hatching nightmare so it is important that they are closely monitored using a thermometer and hygrometer. The optimal incubator temperature is 37.5 degrees celsius, and the humidity should be at approximately 50-55% until the last 2-3 days where it should then fluctuate to 70-75% during the hatching process (this can vary depending on your incubator model, so be sure to check this beforehand). If you need to increase or decrease the humidity in your incubator you should adjust the vents accordingly, or add or take out water as necessary. Outside environmental conditions will affect both the temperature and humidity inside the incubator, so make sure the incubator is kept in a fairly temperature controlled area.5. Tips for Turning
Most good incubators will be equipped with an automatic egg turner that turns the eggs around every one to two hours. If your incubator doesn’t have an egg turner you will have to do this yourself, however turning every two hours just isn’t practical, so three to five times a day will be fine. Turning is performed to prevent the embryo from sticking to the shell membrane and even out the temperature within the egg, so it is important to turn them more so in the first week (5 times a day), scaling back towards the end (3 times a day). Turn eggs halfway each time, marking them with an X on one side and an O on the opposite side, so that you can tell which way your eggs need to be turned on the next rotation.
6. Correct Candling
Candling is best performed on days 7,14 and 18 to monitor the embryos growth. For the best success when candling, work as quickly as possible so the eggs aren’t kept out of the incubator for too long, and make sure you know what you are looking for to speed up the process. If the egg is developing normally, you should be able to see a dark spot with vein like formations coming from it (can be seen in photograph below). It can be a good idea to practice your candling techniques on lighter shelled eggs prior to incubation.

7. Hints for Hatching
Your eggs should ideally hatch after 21 days (bantams may be closer to 19-20 days), and once they have started the hatching process they can stay in the incubator for up to twenty-four hours. It may take them up to a day to hatch, so as long as they are making progress, (peeping and movement) don’t interfere with the process-it can do more harm than good! Only assist if a particular chick seems to be struggling,where you can help to carefully peel the shell off the chick. Make sure you do not rush the process.

8. Enjoy the Experience!
Raising chickens right from the incubation period is an incredibly rewarding and great learning experience, and one that is incredibly exciting. While there are some factors of incubating that can seem stressful, remember to enjoy this truly remarkable period-the welcoming of new life!
Helping to bring new life into the world is a joyful and extraordinary experience for the whole family. Nothing compares to seeing fluffy little hatchlings peck out of their shells. Getting to this perfect moment does come with a fair few challenges and risks which can be stressful and overwhelming, especially without the right information.
This is why I recommend our friends at Chickenpedia to all of my readers. They have created the brilliant Hatch A Plan course to help you successfully incubate and hatch happy and healthy chicks. Their course offers the best advice to ensure you build your knowledge to avoid tragic disasters, as these little ones can be so sensitive to temperature! You can learn about the conditions and equipment needed to confidently bring new life into the world.
As chicken keepers, we want to do an eggcellent job when caring for our feathered friends. Many chicken keepers struggle to handle chicken health or behaviour issues, especially in the first few years of having a flock. Chickenpedia have comprehensive online courses on everything you didn’t know you need to know and then some more! From raising baby chicks to feeding and behavior, you’ll find beginner-friendly courses that’ll give you the knowledge and confidence to successfully look after your chickens for years to come.
These courses are exclusive to members only, so flock to Chickenpedia today!